- 웹 브라우저에서 서버로 파일을 전송하여 서버에 저장하는 것
- 파일을 전송하기 위해 JSP 페이지에 폼 태그 사용

파일 업로드를 위해선
1) method : post 방식
2) enctype : multipart/form-data
3) action : 파일 업로드를 처리할 JSP 파일
4) type : file
로 설정해줘야 한다.
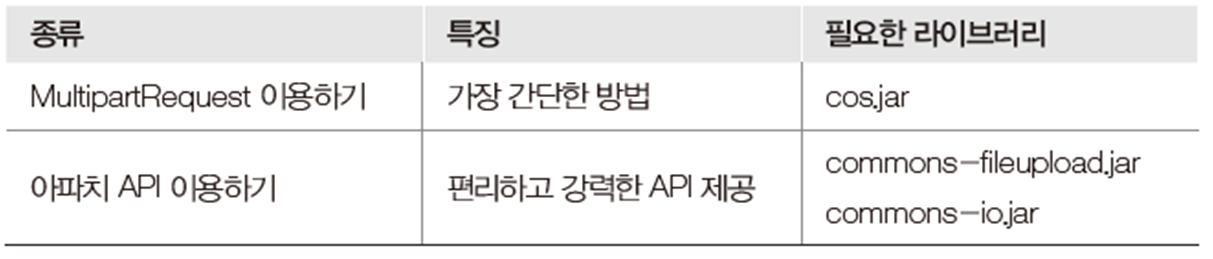
파일 업로드 처리 방법
*DiskFileUpload 클래스의 메서드

*FileItem 클래스의 메서드

파일 업로드 예시
fileupload04.jsp
<%@ page language="java" contentType="text/html; charset=UTF-8"%>
<!DOCTYPE html>
<html>
<head>
<script src="/js/jquery-3.6.0.js"></script>
<title>File Upload</title>
<script>
//document 내 모든 요소가 로딩된 후 실행
$(function(){
	console.log("개똥이");
	//이미지 미리보기 시작. handleImgFileSelect : 콜백함수
	$('#uploadFile').on('change',handleImgFileSelect);
	// e : onchange 이벤트 객체
	function handleImgFileSelect(e){
		// 새로 파일을 선택할 경우 기존의 미리보기 이미지들을 지워줘야 한다.
		$('#pImg').empty();
		// e.target : <input type="file".....
		let files = e.target.files;
		// multiple일때처럼 이미지가 여러개가 있을 수 있음
		// 이미지들을 각각 분리해서 배열로 만듦
		let fileArr = Array.prototype.slice.call(files);
		// 파일 타입의 배열 반복. f : 배열 안에 들어있는 각각의 이미지 파일 객체 1개
		// for(ProductVO productVO : productVOList)
		fileArr.forEach(function(f){
			// 이미지 파일이 아닌 경우 이미지 미리보기 실패 처리(MIME 타입으로 체킹)
			if(!f.type.match("image.*")){	//이미지가 아님
				alert("이미지 확장자만 가능합니다.");
				// 함수 종료
				return false;
			}
			// 이미지 객체를 읽을 자바스크립트의 reader 객체 생성
			let reader = new FileReader();
			// e : reader가 이미지 파일을 읽는 이벤트
			reader.onload = function(e){
				// e.target : f(이미지 객체)
				// e.target.result : reader가 이미지를 다 읽은 결과
				let img_html = "<img src='" + e.target.result + "' style='width:100%;' />";
				// <p>태그 사이에 이미지가 렌더링되어 화면에 보임
				// 객체.append : 누적, 객체.html() : 새로고침, .innerHTML : J/S에서 사용
				// 객체.append, 객체.html()은 jquery에서 사용
				//$('#pImg').html(img_html);
				//객체.append() : 누적,객체.html : 새로고침
				$('#pImg').append(img_html);
			}
			// reader 객체가 데이터로써 읽겠다
			// 이미지 파일 객체(f)를 읽음
			reader.readAsDataURL(f);
		});
	}
});
</script>
</head>
<body>
<!--
파일 업로드 패키지인 Commons-FileUpload는 서버의 메모리상에서 파일 처리가 가능하도록 지원함
이 패키지는 Commons-io 패키지를 바탕으로 작성되었으므로 웹 브라우저(크롬)에서 서버(톰켓)로
파일을 업로드하기 위해 오픈 라이브러리 commons-fileupload.jar, commons-io.jar 파일을 사용
JSP 페이지에 page 디렉티브 태그의 import 속성을 사용하여 패키지를 임포트함
lib 폴더에 해당 jar를 넣어주면 됨
-->
<!--
	파일 업로드를 위한 폼 태그에 method속성 값은 post
		enctype 속성 값은 multipart/form-data,
		업로드된 파일을 처리하기 위한 action 속성 값을 작성
		<input type="file...
 -->
 <form action="fileupload04_process.jsp" method="post" enctype="multipart/form-data">
 	<!-- FormField 추가 --><!-- required  = not null(Constraint 제약사항) ==> 필수==mandatory>-->
 	<p>이름 : <input type="text" name="name" required/></p>
 	<p>제목 : <input type="text" name="subject" required/></p>
 	<!-- 파일을 입력받도록 input 태그의 type 속성 값을
 	file로 작성하고, name 속성을 작성함 -->
 	<p>파일: <input type="file" id="uploadFile" name="filename" multiple/></p>
 	<!-- 입력된 데이터를 서버로 전송하도록 input
 	태그의 type 속성 값을 submit으로 작성 -->
 	<!-- 이미지 미리보기 -->
 	<p id="pImg"></p>
 	<p><input type="submit" value="파일 올리기"/></p>
 </form>
</body>
</html>
전송된 파일을 처리하는
fileupload04_process.jsp
<%@ page language="java" contentType="text/html; charset=UTF-8"%>
<%@ page import="java.io.File"%>
<%@ page import="org.apache.commons.fileupload.FileItem"%>
<%@ page import="java.util.Iterator"%>
<%@ page import="java.util.List"%>
<%@ page import="jdk.nashorn.internal.runtime.ParserException"%>
<%@ page import="org.apache.commons.fileupload.DiskFileUpload"%>
<% // 스크립틀릿
// 폼 페이지에서 전송된 파일을 저장할 서버의 경로를 작성
String path = "C:\\upload";
// Commons-Fileupload.jar를 이용
// 해당 패키지에 포함되어있음
DiskFileUpload upload = new DiskFileUpload();
// 업로드 환경설정
upload.setSizeMax(1000000); // 업로드 가능 최대 크기(bytes->Kb->Mb->Gb)
upload.setSizeThreshold(4096); // 메모리에 저장할 최대 크기(bytes)
upload.setRepositoryPath(path); // 업로드될 파일을 임시로 저장할 경로
// 폼 페이지에서 전송된 multipart/form 유형의 요청파라미터 -> parseRequest() 메서드로 전달받음
List items = upload.parseRequest(request);
// Iterator 클래스로 변환(hasNext()를 사용하기 위해)
Iterator params = items.iterator();
// 폼 페이지에서 전송된 요청 파라미터가 없을 때까지 반복
while(params.hasNext()){
// params.next()는 Object로 리턴 ==> 형변환
FileItem item = (FileItem)params.next();
// 요청 파라미터가 일반 데이터인지
if(item.isFormField()){ // 일반 데이터(<input type="text"../>)
String name = item.getFieldName(); // 파라미터 name
String value = item.getString("UTF-8"); // 파라미터 값 개똥이
out.print("<p>"+name+"="+value+"</p>");
} else{ // 파일(<input type="file".../>);
String fileFieldName
= item.getFieldName(); // 요청 파라미터 이름(filename)
String fileName = item.getName(); //저장 파일의 이름 P1237.jpg
String contentType = item.getContentType(); //MIME 타입. 콘텐츠 유형. 이미지 유형...
// 업로드 대상 => C:\\Users\\PC-15\\Pictures\\P1237.jpg
fileName = fileName.substring(fileName.lastIndexOf("\\")+1); //P1237.jpg
long fileSize = item.getSize(); // 파일 크기 정도
// item(JSP) -> MultipartFile(Spring)
// 이 곳으로 업로드 => C:\\upload\\P1237.jpg
File file = new File(path + "/" + fileName);
// 설계대로 복사 실행
item.write(file);
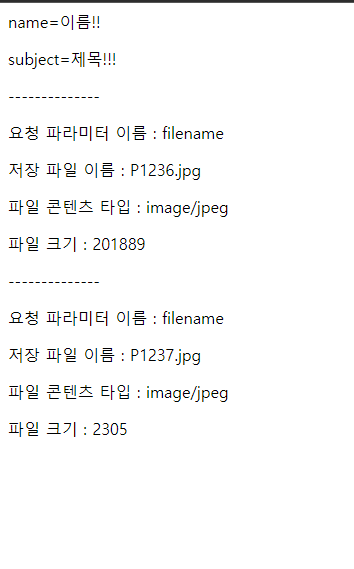
out.print("<p>--------------</p>");
out.print("<p>요청 파라미터 이름 : "+fileFieldName+"</p>");
out.print("<p>저장 파일 이름 : "+fileName+"</p>");
out.print("<p>파일 콘텐츠 타입 : "+contentType+"</p>");
out.print("<p>파일 크기 : "+fileSize+"</p>");
}
}
%>

'JSP' 카테고리의 다른 글
| [JSP] 다국어 처리 (0) | 2023.07.10 |
|---|---|
| [JSP] 유효성 검사 (0) | 2023.07.05 |
| [JSP] 폼(form) 태그 (0) | 2023.07.03 |
| [JSP] 내장 객체 (0) | 2023.06.29 |
| [JSP] 스크립트 태그 (0) | 2023.06.27 |


